Once the mill was finished up the question arose, what's next? Mostly in the sense of whether i'd continuing working at aprovecho or drive down the coast visiting friends along the way (which was my original plan). But after the success of the mill i was feeling pretty excited, the reality i had tried to create in Philadelphia was coming to fruition 3000 miles away- an organization was interested in, and capable of, supporting what i envisioned.
We talked it over and all parties agreed another month would be a positive thing all around. With that decided "what's next?" became a question of what to build. Eleva was building a blender. That left two machines in my repertoire to choose from, a water pump or an electricity generator. Though they were nearly the same, from a structural standpoint, i knew that i could build a pump start to finish without any outside help, whereas the generator would require assistance. So i opted for the pump.


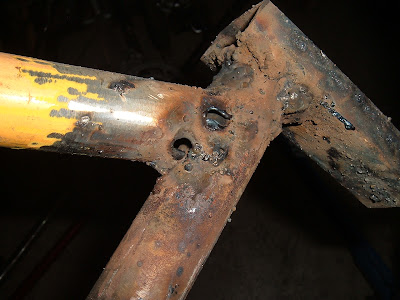
I started building a frame, but discovered that i had made it far too short. I tried making an extending piece, the welding got ugly, i questioned its integrity, and decided to start anew. I went to the pile of bikes and grabbed the thickest looking one i could find. I then decided to build the rear post out of angle iron, for strength and for weldability. Part of the issue with the first frame i tried putting together was how thin the tubing walls were, and as said before, stick welders simply aren't made for this stuff.


(You can see how much better this welding looks than the bike above, the difference in wall thickness between this angle iron and the bike tubes is about 8x, a quarter of an inch compared to .035 of an inch)
Once i had the rear post built, the new frame disassembled and cut, i prepared the front legs (made from forks in classic Maya Pedal fashion). This time i tried it a little differently though, Eleva suggested that i flip the forks around to minimize the amount of welding to the frame. I thought it was an interesting idea so i gave it a shot to see what would happen. To get a good weld i had to grind out a space in the steerer tube of the forks for the chainstays to sit. It also had to be executed with a higher degree of accuracy then normal, specifically because the fork blades would only be able to sit flush on the ground at a particular angle.


To hold the bike in place i flipped the bike stand upside down and propped it up on some buckets and a table. It worked surprisingly well. Once firmly in place, i welded the forks and the rear post on.

I then welded on a seat post and identified some tubing for the stem riser.


And so it stood in its roughed out form, no components yet to attach. One of the hold ups was that the crank arms wouldn't come off. They spun, so i could have left them as they were, but it seemed wiser to pull them apart and give them a cleaning before doing anything else. I yanked on them a bunch and got nowhere, mostly because i lacked the proper bicycle tools to get them loose. So i took them into Rainy Peak Cyclery, Cottage Grove's neighborhood bike shop. The folks at Rainy Peak were intrigued by the bizarre contraption i brought them, enough so that they didn't even charge me for their help (they're also just really good people). Some lubrication, the right tool, and some leverage got it done pretty quick. Thanks again guys.

With the cranks apart i cleaned out the bottom bracket, repacked it and threw a chain and wheel on the bike. Andrew gave it a quick test for sizing, seemed good to him.

At this point in the fall, sometime into mid or late october, i didn't actually have a pump for the machine. Well, more accurately, i didn't have a pump in oregon. I had one in philly (when i built the pump back east i bought two cause they were on sale). Since i was going east for thanksgiving anyway i figured i'd pick it up then. This meant, for the time being, that there wasn't much i could do with the bike machine. I had to have the pump to size the rebar that it would sit on top of. I should have let this stop me, but it didn't, from painting the machine prematurely. More welding was going to happen, but i got so ancy to do something that i just went ahead and painted it.

Even tossed on some red for style.

The height and stlye of handle bars made me think of a praying mantis, and so it was nicknamed.
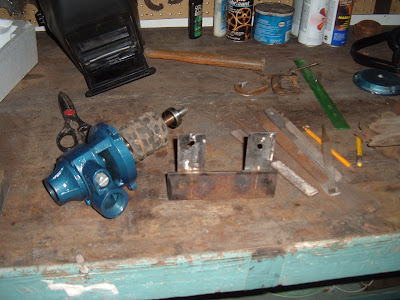
Post thanksgiving i got back to the pump. I stripped the water pump of all of its electrical components, leaving the central magnet and axle intact. I then wrapped mountain tire tread around the magnet and constructed two braces for the pump to attach to.

Once i had that made i could then size the rebar support structure that would run along either side of the wheel. Fortunately old rebar was the single most plentiful resource in aprovecho's scrapyard, other than plastic irrigation pipes. I cut a couple of pieces, straightened them (almost all of it was pretty warped) and then re-bent it the specific angles i needed. Clamped it to the machine, tested the height, got it set and welded it on.

With the rebar firmly in place i then welded the brackets of the pump to the rebar.


At the time this was built it wasn't clear where aprovecho was going to use it, so i held off on actually buying any pipes or fittings for it. Actually, it was almost a year before the pump got some pipes. Apro didn't identify how they wanted to use it, but later in my stay there i used it in demos for a couple of classes i taught. Here's a picture of it much later all set up.

The water pump, or mini-bomba as i had learned it in Guatemala, was enough like most of the other machines i'd made that its construction wasn't especially noteworthy or instructive for me. Plus i'd built two already, in pretty much the exact same manner. One thing i wish i knew more about was the actual mechanics of the pump, specifically its actual potential. My best guess was that it would work well to pressurize drip irrigation for blueberries, i also thought that it could be used to pump rain-caught water up to a holding tank on a roof. I did test it once, when i took one up to NY from Philly, it got a run at the Quaker Village. We had it at the base of 15 foot tall structure, my friend Dan biked (vigorously) while my other friend Pat climbed a ladder to the peak of the roof, stood tall and held the hose over his head. Easily over 20 ft. high, but it was pretty tough, Dan ran it for a few minutes, moved probably about 3 gallons of water. But 50 or 100? Probably not, even for Dan who's in really good shape.


If you live in an area where the water table is close enough to the surface, you probably have an above-ground pump that transfers water from your well to a holding tank. It has an impeller that drives water through a small opening in the front of the pump, creating a vacuum behind it that draws water from the well.
ReplyDeleteThank you for sharing this post. I found it very interesting and informative. You seem like you are very handy with water pumps. I am looking for pump rental to help out with this job I am doing. I am researching on the internet for people who know water pumps!
ReplyDeleteMarvelous DIY work, Is this for pumping water?
ReplyDeleteThanks for sharing.
ReplyDeleteIf you are planning to buy water pumps online, choosing the right model can make daily water management easier and more efficient. From small household needs to larger applications, having a dependable pump ensures a steady water flow whenever required. Today’s pumps are designed for simple installation and reliable operation, making them suitable for both personal and business use. Shopping online allows you to compare different models, understand their features, and select the one that best fits your needs. In Lebanon, Arison offers a range of quality water pumps that meet different demands, helping customers get the right equipment without leaving home. With the right choice, you can keep your water systems running smoothly and with less effort. Shop now!