
At some point someone had hooked up an old exercise bike to a country living grain mill. This is probably the most common form of pedal power to come out of the seventies, at least in the states. (I can't tell you how many aging hippies have told me they had one once on their "farm"). Though this one was not from the seventies, it was built maybe only a few years prior. For all intensive purposes it worked, but not very well.

The first thing i noticed was how rickety it was. It didn't stabilize very well, in part because it was a cheap old bike in rusting disrepair, but it was compounded by the fact that it was twist-tied to a piece of plywood for its base. No welds, no bolts, just pieces of wire once wound tight now loosened with time. Also, the handles weren't rigid, they had some sort of "exercise function" in that they would pivot at the base where it was hooked up to a hydraulic pump. I suppose the idea was that you could work out your arms while you pedaled. But the net affect in its re-purposed form was that you couldn't lean on the handle bars at all, they would just slowly creep forward til they were too far to reach.


The second thing that i noticed was the gearing. The rider would pedal pretty fast, with little resistance, and the mill would turn slowly. This was a pretty obvious waste of energy, and also uncomfortable to use.
The third thing was that the mill was on the ground, meaning you had to bend over to load or unload it. Also, that close to the ground the mill could easily get crap in it that you wouldn't want there. Generally having food processing going on near feet seemed like a bad idea.
So the first thing was to get the actual mill off of the ground. It would need a table. But a table with a slot in it, for the belt, otherwise the bike, or at least the pulley would have to be at table height as well. (In hindsight i can see that having the pulley at the height of the table would have made several things easier, namely building the table, but at the time that didn't occur to me).
I set about designing the table, thinking of the ideal height for accessing the mill, as well as having adequate space for containers and any other necessary equipment. Being average height, i used myself for a reference to determine the approximate measurements.
I came up with a rough design for the table that seemed like it would work well, showed it to Chris (the builder on site) and was shown a source of wood i could use to build it. I wasn't quite ready to build it yet, because i didn't quite know what the mechanical apparatus was actually going to look like. But having the table roughed out helped determine the route of the machine.

The next thing to figure out was how to gear it. I'd learned some very practical points about gear ratios from reading the Human Powered Home, and was very pleased to be able to put them to use right away. Measuring the circumference of the pulley on the mill, the pulley on the flywheel, the cog on the flywheel and the chainring on the bike, i was able to determine the gear ratio of the mill. In other words, i figured out how many times the mill spun for every one full rotation of the pedals. (Don't remember the exact number but it was something really low like 1:1)
Where should the ratio be instead? I wasn't sure, so i just guessed. I figured the mill should spin at least three times for every one full rotation of the pedals. I looked at the measurements i had taken of the existing cogs and pulleys and realized that to step it up to that level would require a chainring much larger than anything commercially available, let alone kicking around in Apro's collection of old bikes. Fortunately, one of the concepts i learned from the Human Powered Home was the idea of compound gear trains. Basically taking several gears of modest size to accomplish what one really big and one really small gear would accomplish. As far as i understand it, the fewer the gears, the fewer the chains, the less friction involved, the greater the efficiency. So the compound gear train wouldn't be the ideal for efficiency, but true to form with appropriate technology it was what was available, easily replicable and reparable. (P.S. from here on out i'm just going to refer to appropriate technology as AT).
So i took a look at some gears that used the same kind of chain, counted their teeth, and came up with an accurate calculation of how many times the mill would spin for every one full rotation of the pedals.

It came out right around where i wanted it, 3.7:1.
I grabbed two bikes to start experimenting with. First i took apart the bottom brackets, cleaned them off and repacked them. I took the flywheel apart and cleaned that too. Put it all back together and onto the bike to make sure it would fit in the dropouts. Got it all hooked up and the chain rode high on the gear of the flywheel. The chain wasn't wide enough. New chain, all better.


I then mocked up a fixture, using the rear end of a bike, for holding a cogsette to complete the gear train. It was too small. So i found a bike with much longer seat stays to give me the distance i needed.

I put the new fixture roughly into place, it looked pretty good. I saw that i would need to put a brace across the chainstays of the bike in order to weld it securely.


My welds still looked pretty bad, but they held. (It was fortunate that i had learned how to weld with a stick welder in Guatemala, because that was exactly what apro had).

I was so excited to see the thing run, that before i even had it all the way welded on i asked Elliott to get it spinning so i could tape it.
I then welded on additional supports using some rebar that was lying around. With that complete i had to figure out exactly where to cut it away from the rest of the bike. As you can see there's no way this thing could run in its current state.
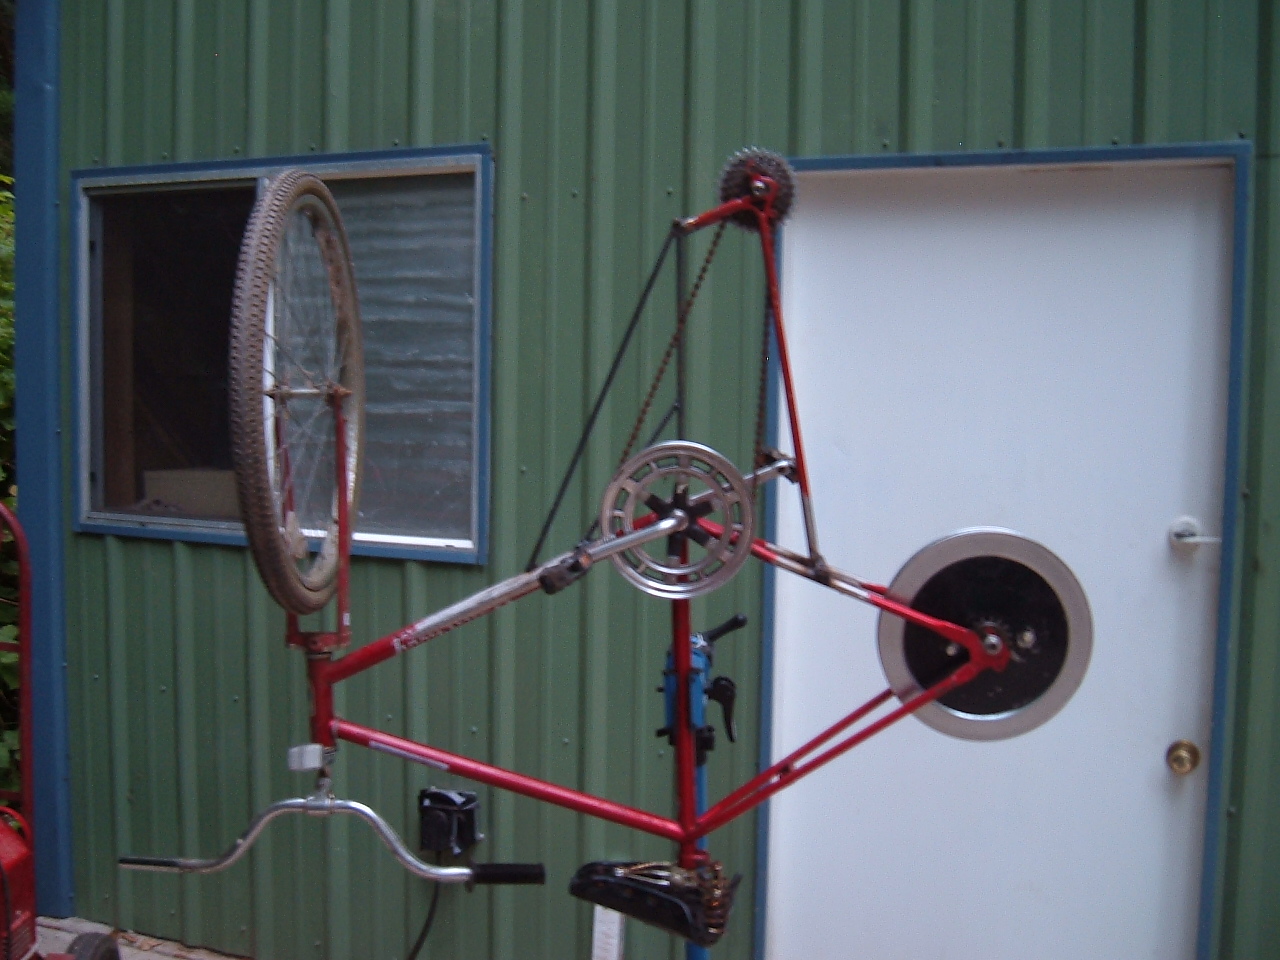
My friend Eleva, one of the students in the SLS, was really intrigued by the whole process and stopped by sometimes to help out. She did the honors of ridding the machine of its unnecessary tubing.


Now that i had the thing apart i could get a clearer sense of how it was going to interact with the table. I positioned it in place, even propping up the mill so that i could get all my measurements set.

With all of the measurements set i could now move forward in building the table for it.
One of apro's major assets is the wood on its land and the proper facilities to fell and process all that wood into homes, furniture, or fuel. So building the table was pretty straightforward.


Once i had the table built i made some adjustments to the machine, namely putting bracing on it to attach it to the table, as well as a strip of angle iron running along the bottom for structural integrity and also to bolt it to the deck.

Once i made sure that it all worked in the shop i took it up to the strawbale porch where it was going to live. I got it all hooked up and asked Jared, the fake Canadian, to give it a test run.
Everything worked great, the resistance was really good, it ground flour much faster, the mill was easy to access, the table served as a good workspace, and the whole thing was very stable. All the old issues had been solved, however, there were a couple of new ones. But i'll come back to that in a minute.
After testing it in place i took it apart again to paint it, for aesthetics, but moreover as a preventative measure against rust. It rains in the northwest all the time, its not just Seattle as my naive east coast upbringing had me believe, no, its everything from northern California all the way up through Canada. Moss and rust. Lots of both.
After testing it in place i took it apart again to paint it, for aesthetics, but moreover as a preventative measure against rust. It rains in the northwest all the time, its not just Seattle as my naive east coast upbringing had me believe, no, its everything from northern California all the way up through Canada. Moss and rust. Lots of both.

Building this mill was great for me. Although i'd built several machines in Guatemala and a couple on the east coast, this was most involvement i'd had with anything thus far. It was an awesome opportunity to problem solve, experiment, and construct from near scratch. And the near scratch part was important, at this stage in my learning i don't think i could have made a decent flywheel, let alone one with a pulley attached to it. Having the flywheel and mill already constructed and working was crucial. It was the perfect challenge for me in that moment, i learned a lot in doing it.
With some time and further learning in between myself and the mill there are several things that i can see could be better. Its too big. This is kind of inevitable with pedal powered machines, but this one could definitely be made smaller. The chair would be better suited being attached to the machine, or bolted to the ground as some people end up pushing themselves backwards while trying to pedal. Another way to fix that would have been to put handles on it. Also, the chain, over time, has bent all of the stays towards the drive side of the machine. This could have been avoided with a greater structural engineering emphasis (something i don't know that well). Another way to have fixed that would be to put a derailleur in there somewhere. And that goes for the belt on the mill as well, not a derailleur per se, but a belt tensioner. Belts and chains alike stretch over time and having a way to keep proper tension on them is key to efficiency.


HayStar - Buy attachakki online, domestic flour mill, domestic atta chakki machine, gharghanti for home, attachakki for home, atta chakki manufacturers,gharghanti price india, attachakki machine for home use , flourmill manufacturers, best flourmill machine, flour grinder machine and automatic atta maker machine
ReplyDeleteFor More Information Visit Here -- domestic atta chakkimachine
Jagruti Appliances is the TOP 10 Gravy Machine Manufacturers & Suppliers in India. These Gravy Machine are manufactured under the guidance of a team of experts. These machines are once again checked for quality before they are dispatched to the customers to ensure that our products are flawless.
ReplyDelete